
Now that that the Caddy stops, its time to drop and roll.
The 67 Cadillac Convertible is a heavy car weighing in at about 4500lbs. When you attempt to research a project, you can never research enough and if you do not stop researching, it will never happen. I looked at several kits and I’m going to go off and say that you really cant do intelligent air for a big car for under $5000. Though I did try to do it on a budget, the reality is that I fell forward and felt like I had to buy the rest.
As each car and its owners budget are different, most kits seem to be sold as a “part A” (the bags, hoses and brackets) and “part B” (the air management system, compressors, tanks and hoses). As a consumer, you pick the part A and part B that fits your car and your budget. My budget was artificially small, so I decided to only buy part A and plan to do the air management in the future. The writing assumes though what can happen if you do this and the catastrophic impact to someone that really does have a small budget that is taking this path.
I had looked at lots of kits, but where I was landing (good or bad) was with EZ Air which had a budget minded kit or with RideTech which had a great reputation and a solution that included parts that would seem to bolt in with minimal cutting. Ultimately, I chose RideTech only because they offered a non-pressure leveling system that I wanted to have in the future.
Purchasing only part A
(A is for “Assumptions”) and assumptions are never right.
Discussing my desire to keep costs down with RideTech, we came to agreement that I could install air ride with the addition of 2 x $35 airline kits that included schrader valves that I could fill the bags from an air compressor. At a glance, this seemed like a brilliant solution. I could install air ride, get the car riding better and simply set the ride height with my personal DeWalt air compressor. Set it and forget it.
Upon the delivery of the 1965-1970 Cadillac suspension kit from RideTech, I spend the next 4 weekends (I have kids) grinding away at the front spring pockets to provide clearance for the new ShockWave airbag/shock all in one that should bolt right in.

The instructions indicate that this needs to be clearance, but as a non-expert, I didn’t clearance enough and one of the Shockwave units had to be replaced. (add 2 more weeks)
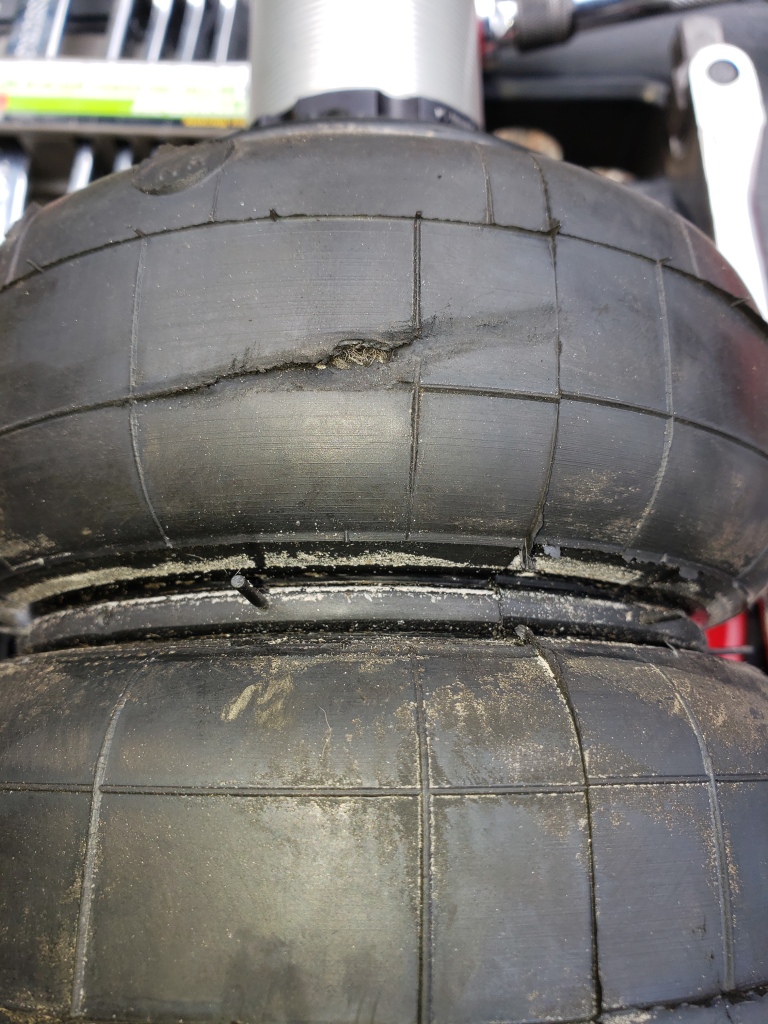
On week 6, I finally had the bags installed and its time to air up. Keeping in mind that I am going for a static ride height; plugging my air compressor in and airing the car up, the front end was hardly 3 inches off the ground. (WHAAAAAAAAAAAAA) Ok, 6 weeks to install and deal with a scraped bag and the car is still too low to drive anywhere.
Calling RideTech, they inform me that sometimes you may need to inflate the bag to as much as 150psi. Ok, so most cars I read are running around 110psi on the front and my air compressor only puts out 120psi (even though the gauge says 200psi!) So now I need to figure out how to get the extra 30psi into the bags.
Luckily my neighbor has one of the 50,000 gallon air compressors and that should surely do the trick. Interestingly enough, it has a pressure regulator on it that pulls it back to 120psi. We were able to override that value and get the car up, but then we found leaks….. After 4 trips to my neighbors house, I realized part B is not really an option.
Back on the phone with RideTech, I’m now starting to feel like someone whose back yard automotive skills are not up to the task, mind you that I just sectioned the oil pan and re-installed the engine. (Yea, so that was project 5.5 and we will come back to that one). Discussing the issue with RideTech, it now appears that maybe I need bigger bags on the front or I will need the means to easily get the air pressure up to 150psi through on board air compressors.
I’m a bit speechless as the kit is advertised as being designed for the 65-70 Cadillac DeVille. You might be able to argue that because my particular car has a Chevy 454 instead of the OEM 472, that maybe my car is heavier in the front end. Before you place an order for a kit from any vendor, have a clear understanding about your expectations such as how fast should the car raise (1 sec vs 120 sec) and clearly understand how much the car weighs. If the vendor cant tell you how fast the car will raise with the proposed set of parts and your stated weight; find a different vendor. (RideTech cant do this)
Purchasing part B
(B is not for “Bags”) its for the bullshit your going to tell your significant other when you get ready to drop another $3000 when you promised it would only cost $1800.
So bags are installed, air lines are run into bicycle tire tube valves in the trunk from the wheels and I have found a leak around a union I used towards one of the front wheels. Upon discussing the issue with RideTech (we are now pen pals), they make the suggestion that I remove all fittings that are not required as any fitting can create an opportunity for a leak. I’m now starting to understand why some folks say just go with springs.
Overall, installing the air management components was pretty easy outside of the wiring is a mess, I now need a battery or another 4AWG wire run from the battery in the front and I still need to clean up the hose mess that is the tank and compressors. I do read instructions, but I also like to try to get things to functionally work first and then clean it up later. After months of messing with the car, it does drop and roll, but easily has another 16 hours of work. Air ride not complex but should have an order of operations and so far I have done the last thing first and the first thing last. This is why installers want $3,000 to install air; because they know the order.
Recommendation to any fool that wants to do this themselves
The most exciting part of air bags are the action that the bags provide; but make no mistake that unless you’re a professional; the bags should be left for last.
Plan it big and deal with the cost. Install the air management (tanks, compressors, etc first). Go big on the air lines and talk to the company about the bag size. If the sales guy leads you to believe that you should probably go bigger, you probably should.
The size of your car matters. Bigger cars either need bigger bags or more air pressure and high pressure results in crappier ride.
Big brands don’t always account for the right product. They are like all companies trying to sell stuff and price them accordingly.
Lastly, if you have a big car; your going to need more than a 5 gallon tank.
The steps to install air…
- Determine how much power needs to be delivered to your trunk. (eg: Air compressors, ECU, stereo amplifiers, etc)
- Install a second battery in the location where your going to have air tanks and compressors (eg: trunk)
- Figure out how big the valves and air lines need to be for the car.
- Purchase your air management solution (tanks, compressors, valves, etc)
- Assemble and fully test the tank for leaks with an air compressor prior to installing
- Assemble tank, compressors, and ECO on a test board and again test for leaks
- Install air management solution in the car (no air lines from valves to bags yet; you don’t have the bags yet)
- Figure out what bags are needed for the car
- Identify how much your heaviest axle is that will be sitting on bags
- Identify how fast the heavy side of the car should inflate
- Identify what bags you are thinking about or are being recommended
- Identify exactly how much space (diameter) they need when inflated
- Make a template that can confirm that space + 1”
- Identify where your going to install the lines and what fittings you will use
- Purchase bags and air lines
- Pre-inflate the bags and leave them in the trunk to make sure the fittings don’t leak
- If cutting is required, do what ever is necessary to validate that it doesn’t scrub. Don’t be in a hurry here
- Install air lines from the tank towards the wheels
- Install air bags
- Drop and Rollllllllllllllllll
