Project #4 – Wacking the Mole

As I’m still writing stuff that brings us up to current (stay tuned for Project #5) and still ignoring the breaks

I have to reiterate, I’m still not hating on John (the guy I bought the car from), but there were a lot of little things that needed work. When I picked up the car, it had already been warmed up and being that it was a warm day, it stayed warm until I got it home and had to start it in the morning.

The Green Devil~le

As my family started to pour over the car and ask questions, I was quick to notice that the male (inside) sections of both rear seat belts were missing, misc light bulbs were burnt out, the dash lights didn’t work and the vacuum assist was not hooked up to the distributor. Most of these were easy fixes, though the dashboard will have to wait for a later update. (It was bigger than expected)

Though I had already installed the EFI (ordered it the day after purchasing the car), one of the reasons I had ordered it was that the car was cold to start, didn’t idle well all of the time and stalled for various reasons. I had receipts for getting the carburetor tuned 4 times within 24 months, so though I thought I was solving the problem with EFI, the fact that we still had issues was no surprise.

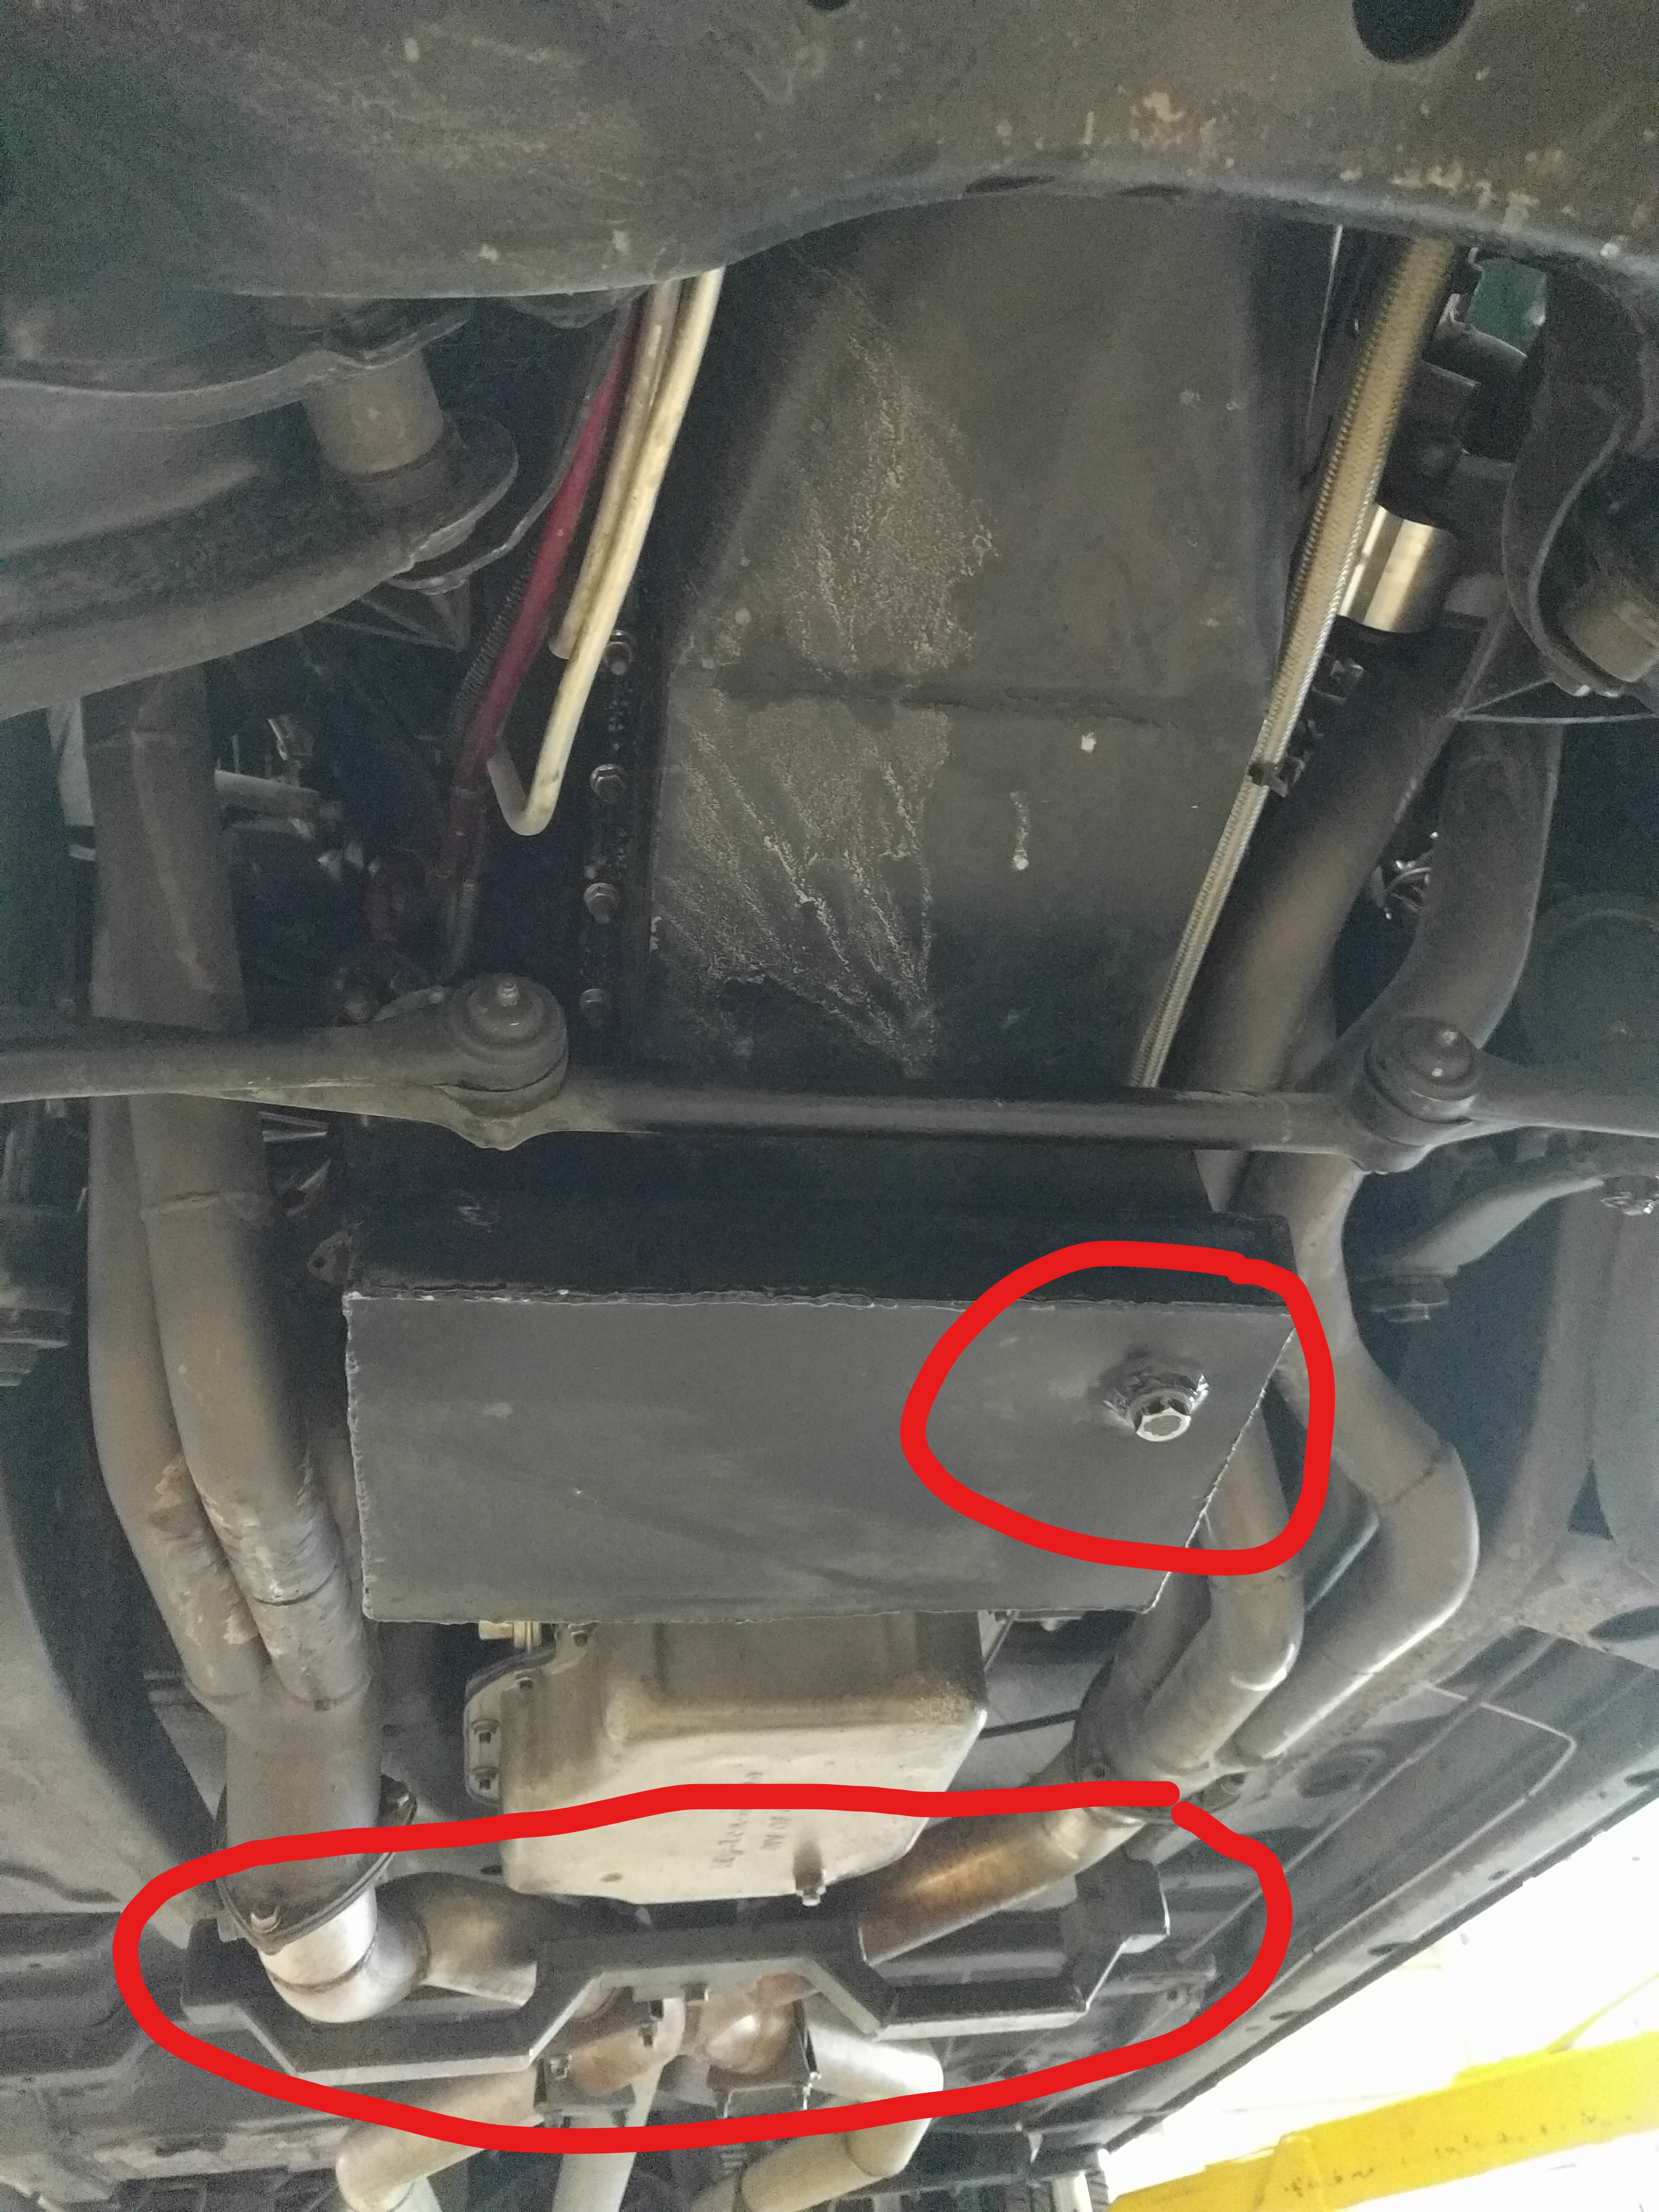
If you built the system or you knew the system, troubleshooting is pretty easy. You know where to look. If you don’t, sometimes its easier to simply unplug everything and start re-assembly. In a world of stepper motors and electrical connections, we forget that in the 1960s, many systems were controlled by vacuum. This includes the gear changes on the transmission, heater controls inside the car and the trunk release. Poor John paid a well known Kirkland company to adjust the carburetor 4 times in 2 years when all they really needed to do is find the vacuum leak. In this case it was everywhere.

Vacuum leak in the heater control

Though the transmission was not connected, this was an easy fix as the hose was still connected to the carburetor (and now my EFI throttle body (TB)) and just hanging next to the transmission. The more difficult one to find was the heater control. The TB had a small vacuum line T’ed with the one that was suppose to go to the transmission and ran into the firewall. Tracing the hose to the heater control switch and testing the diaphragms that open and close for heat, I decided to pull the heater control. What we found was that when the heat or the defrost was on, the system held vacuum. When the heater was OFF, there was a wide open vacuum leak. In other words, if you want the car to run right in the summer time, better turn on the heat! 😁 The switch has since been fixed, but is still sitting on the bench and so the vacuum line is just plugged off. The car now does not have a vacuum leak, but also has no heat on those cold days.

Heater Control
Measures ZERO on the Off position
The actual valve that failed

Don’t play Wack-A-Mole

Having fixed (temporarily) the vacuum leak, I started to look at the distributor vacuum advance. Like many things, this is a religious debate within the hot rodding world. The reality is that if your not drag racing and you understand what it does, you will hook it up. (learn more here)

Of course, once you hook it up, you realize that you need to adjust the timing. Then you look at your check list and see that you need to fix an oil leak and the heater core is leaking. That oil leak happens to be the intake manifold and now you have to tear the distributor back out so that you can remove the manifold. You get the manifold back in, re-install the distributor, start to time the car and realize you don’t understand timing well enough because everything you learned was based on initial time and not total timing. The car runs overly hot due to retarded ignition and pops a hole in your headers. This story goes on and on and on for a few more weeks.

I love project cars, bikes and the nature of it. I love to learn, but this hobby can be costly if this is how your learning. Thankfully I can afford some of it and I have not burned too much money, though I have burnt plenty of time.

If you do something like this, pay for a full inspection from someone that understands the type of project you want to undertake. This will give you the check list and ask the inspector for advice on the order in which to resolve the issues.

In a perfect world, order of operation might look something like this

  1. Fluid leaks first! (this includes brakes)
  2. Vacuum leaks
  3. Ignition
  4. Exhaust leaks
  5. Brakes
  6. Drive it and evaluate everything else
  7. Fluid leaks first! (this includes brakes)
  8. Vacuum leaks
  9. Ignition
  10. Exhaust leaks
  11. Brakes
  12. Drive it and evaluate everything else

On that note, we have pretty much caught up to the current day. Stay tuned for upcoming projects on the Green Devil~le (which may or may not include fixing the brakes) 😜

The ATS (All Terrain Stroller)

WP_20130401_010

I started writing this 6 years ago when my son was 2 and for the life of me I cant find a higher res image, but thought it would be fund to post regardless.

Having your first child can be hard on your ego. My son born in a neighborhood full of little girls the same age wanted nothing more than to play with the girls and push baby strollers around. I didn’t really have a problem with the concept of my boy pushing a baby stroller around, but I also didn’t want to buy one being they only come in pink. (my EGO)

Then came the opportunity where one of the neighbor girls had an extra one, but the wheels were falling off (they drove them hard around our cul-de-sac like NASCAR was in season). Being a maker at heart, I took the worn out stroller, painted her red, but some aluminum nerf bars and 8 off road wheels from an old RC car and BAM!; my boy had the coolest stroller among his peers. Even the girls liked it. πŸ™‚

Don’t let your ego get in the way of children having fun, but sometimes it can kick start your own creativity they can all celebrate.

Project #3 – Exhaust & Transmission Cross Member

Cause brakes and stopping the car is still not the priority yet

When you buy someone else’s hotrod, you should expect some poor design choices and feel lucky if there was any design in the choices made. When I looked under this car, I saw a few things that worried me other than the oil leaking on the headers. (yes; the Cadillac has headers)

  1. The oil pan sits way to low to the ground
  2. The drain plug in the oil pan is facing down so it can be ripped right out of the pan if it right
  3. the transmission cross member looked like one off of JEGS designed for a Camaro, but slipped in upside down and 2″ from the street surface

Consequently, every time I drove into a parking lot or god forbid a speed bump, I would hear this horrible scaping only hoping that it was not the oil drain plug.

I’m pretty sure that one of Johns friends had made a decision to put a 3″ dual exhaust system on a car that was designed for a single exhaust and due to the size of the tubing and the design of the cross member, they would need to do something creative. While assessing the problem, I also discovered that the exhaust tubing was likely a tube kit as each joint was riddled with burn through holes. Don’t get me wrong, I could not have welded it any better, but this was a turning point.

First I located a original cross member from a junk yard in Spanaway (not a good idea either, but we will roll with it) and refinished it.

It seemed like a good idea at the time and I should have asked a couple more key questions like “why is there only one hump in the cross member?”.

I then proceeded to disconnect the exhaust system, install the new cross member and re-connect the 3″ exhaust…….oh F@#$. If you guessed it wouldn’t, fit; then you were spot on. The cross member being from a car with a single exhaust didn’t meld to well. On the other side, the exhaust was full of holes, so off to the exhaust shop to build me a new 2.5″ exhaust system that fit with the crossmember.

Sometimes you have the opportunity to spend a little more and do it right (like build a new cross member at the exhaust shop) and sometimes you say; “nope, I have spend enough”. The challenge of course is that you will likely go back and do it over to make it right.

It works well, there are no more holes and I can drive over speed bumps, but one day; I will take apart again and do it right.

Project #2 – The Stereo

Because yeah, tunes are more important than brakes (shaking head)

It was my understanding that John (the previous owner) was gifted the car from a close friend of his. Prior to dropping big horse power and wheels, I’m sure he just really wanted a nice sounding ride and went down to his local CarToys store (Seattle area stereo shop) to install some great tunes, but didn’t want to cut up the dash. It all makes sense, but the implementation made none.

Lets start with that the original car came with a AM/FM Amplified stereo. That’s right; in 1967, the car shipped from the factory with a stereo, dedicated amplifier and 4 speakers (2 under the dashboard and 2 under the convertible roof tray). On top of that, the car also had an electric antenna that was triggered by one of the knobs on the factory stereo.

So being that the tunes are lacking that desirable full sound and base that my other car has, lets take it down to CarToys……….πŸ™ˆπŸ™‰πŸ™Š

What they (CarToys) did next was mind blowing. First they installed a marine stereo on its side (which the docs say don’t do) next to an amplifier in a trunk that has a rusted hole where water leaks into if your driving in the rain. To control the new stereo in the trunk, they created a box with a Bluetooth remote that they mounted between the dashboard and the front seats like a center console that prevented the electric seat from moving forward. Don’t dream of FM on this new deck as the antenna is still connected to the original stereo. To finish it off, they cut 4 fresh hole into the doors and rear interior quarter panels for new speakers only to leave the rears out as they interfered with the hydraulic convertible roof mechanism.

The result is 2 complete stereos, 8 speakers, 2 subs, 2 amplifiers, 2 head units, no FM/AM and a opportunity to burn the car to the ground if you get water in the trunk.

The Fix

Being that John had the Chevy V8 installed and I’m not much of a “Original Car” kind of guy, I understand where John wanted to go with this. Unfortunately, professional audio installers had no clue.

The first task was to remove all of the audio gear from the car and understand what was there (called out above). The challenge with new decks is that they will never be current or state of the art and will always be an old deck. On the other side, the original stereo will always be vintage, look cool and sound just ok. After removing all of the gear, my decision was to have the original stereo rebuilt internally so that it looked old, but sounded new. I would keep the speakers, but mount them in the original location and hide the sub using the newer amplifier. The end result would be a stock looking great sounding system that still enabled the electric antenna.

The stereo work was handled by a guy in Shelton WA called BillTheRadioGuy. Overall, I’m super happy with the results and I now have a 60’s deck with metal knobs (not plastic) that looks and feels like it did in the 60s, but is connected to modern amplifiers and speakers. In addition, it supports line in and Bluetooth which makes for a super experiance while streaming music.

Rebuilt Stereo just arrived

Antenna Fix

Nothing is ever easy, even when it should be. Getting it all hooked up was as easy as installing any other stereo (except probably harder for a professional 😁) However, though the antenna did receive reception, it did not go up and down very well.

In 1967, you could get what’s referred to as a “Shop Manual” and it has steps for disassembling the antenna!

The antenna really just had one problem and that it was bent. In order to fix it, you have to remove the antenna staff from the grey metal tube (which requires a bit of de-soldering) and roll it out between a couple wood 2x4s. That’s right, roll it out! This project took about 2 hours only because I didn’t know what I was doing. While reassembling, add some silicone lube and WAA~LAA! a working antenna.

Project #1 – Installing Holley EFI

We don’t think about how lucky we are today when driving a car. It could be a brand new Ford pickup or a late model Ford Fiesta. What we forget is that you can get into the car when it has been outside for 2 weeks in the freezing cold and it will start immediately. Upon starting, we don’t even think about letting it warm up; instead we instinctively throw it into reverse, back out of the drive way and head on down the road.

Old cars are not like that. They are hard to start, take time to warm up and die when you put them in reverse if they are not ready. There is not always a temperature gauge in the car to tell you when it is warm, you just kind of have to guess on that cold December morning.

Thankfully today, we in the Hot Rodding world are spoiled and we have companies such as Holley, Haltech and many others that produce EFI (Electronic Fuel Injection) systems for older cars that traditionally ran a carburetor. You can watch videos online where folks will show you how do install (with a hoist and all the necessary tools and experience) un less than 8 hours.

You may ask your self (as I did), is this real, should I do this or is it worth the cost? After doing this, my answer is yes and no. Its not complicated and you can do it, but its going to take you more than 8 hours and the cost is significant

I don’t have many pictures from this event, but it also may not have warranted many outside of my father and I under a Seahawks canopy while it was snowing in Seattle during December.

This was by far the easiest project we had. It took my dad and I took 3 days to complete, 2 of which was getting a return line into the gas tank and running fuel lines. The kit came with rubber hoses, but I would recommend not to use those and to go steel. I now have a plan to replace them all, that that will have to wait. Once the return line was in place, it was really a processes of drilling holes, mounting the ECU and swapping out the carb for the EFI throttle body.

The results are amazing. The car cold starts well, drives better than it ever had previously and the amount of data you can get access to is mind blowing. It in it self is by far one of the best upgrades we completed. (Yes, still need to tend to the brakes)

The Purchase and new car blues

I picked up the Green Devil~le in September 2017, so just over year ago. When shes good, we call her Ivy; but shortly after brining her home, the evil side showed her smile. The car was fairly low mileage with 79k on the clock, a nice set of custom wheels installed, a new top, fresh paint and a 454 Chevy V8. Not to shabby for $15k.

Looking through the receipts, we quickly found the list of problems that we would need to sort out as well as discovering that the car was hard to start when cold, took for ever to warm up, major holes in the home built exhaust system, a transmission cross member that scraped on speed bumps and brakes that were simply scary to drive over 60MPH in the city.

A normal person would have sorted the brakes first, but I’m not normal

I had some plans when I first bought the car and so rather than inventory all the issues like a smart person would, I started with getting EFI installed in the car. I figured I would be a lot more motivated to get car sorted quickly if it was easy to start and didnt stall when going down a hill even if I should have brakes to stop it before I get to the bottom.

The Green Devil~le

In September 2017 which seems like yesterday, I purchased John’s 1967 hotrod Cadillac Deville. Like most hotrods, they are unfinished and this one was no different. The engine didn’t run well, it was hard to start and even harder to stop. When she runs well, we refer to her as Ivy; when she doesn’t, we call her the Green Devil.

This is the journey, feel free to ride along.